I am drooling.
Here are more:

I bet my little Wentworth never knew she’d be singing show tunes at a karaoke bar in Little Korea, but she did!
Here’s a very sketchy video of her karaoke debut. I was actually in there making a birthday video for my little sister who’s living in Germany, but hey, there’s never a bad time to bust out the saw.
This is me, my friends Nelson and Mariel, and my lovely little Wentworth.
Just ordered the 36″ Charlie Blacklock. Sawbservations to come.
Last week I played two very different saw shows in the same night and it led to some interesting sawbservations.
The first show was with Calamity Royale at one of Toronto’s most magical music venues, The Music Gallery. It’s actually a working church that can be booked for shows and it’s really quite stunning. We played with the amazing Willow Rutherford and Montreal’s Music for Money (whose lead singer is actually a human drum machine and it’s mind-blowing).
Anyway, our band consisted of a cello, double bass, horns, Calamity on piano and my saw. Without drums, and with the obvious acoustics in the church, we just used a condenser instrument microphone clipped onto the saw — which should have been completely enough. However, I learned that as much as a saw sound is meant to carry in a space (which is why it doesn’t work well with contact mics… you to pick up the sound from the air and not just the vibrations of the object) it still could have used the duo setup with vocal mic. Some people mentioned it was a bit quiet.
Then, I rushed to The Tranzac for a late-night set with The Lipliners, which is where I usually have the hardest time amping the saw. The Lipliners is basically a mini-orchestra with tons of people on stage and lots of loud instruments in a small room.
As I’ve mentioned before, amplifying the musical saw in a large/loud band setting is a real challenge because: Having to crank the sensitivity of the mic(s) allows for a lot of bleed-in from louder and neighbouring instruments, especially the drums (sit behind the drums if you can) and, it’s always a challenge to hear yourself in the monitors.
But, The Lipliners’ super sound man Colin had an idea for the second set. He suggested we plug the clup-on mic directly into a bass amp (still no vocal mic) and then he sacrificed a good chunk of the sound in the monitor for room sound. (It’s also important to note that just because your band can’t hear you, it doesn’t mean the crowd can’t hear you. Get the sound man or a friend to go back and give you a subtle hand signal if you’re getting self-conscious.)
The result was wicked. The saw could REALLY be heard, so much so that I actually got a bit self-conscious and started worrying about overplaying or being obnoxious (mostly because knowing I was missing a lot of monitor sound made me have to be extra careful with how loud I was giving ‘er.) But, everyone commented that it sounded awesome and Ronley said she could finally actually hear it.
So, who would have thought — surprised by a night of sawbservations again! I love this instrument. It definitely keeps you on your toes!!
There was a lot of spooning at Hillside last weekend in Guelph, and I’m not talkin’bout Nelson and I in the tent.

Here’s a little video I snuck of drummer Robbie from (The) Patrick Watson(s) at Hillside 2009 last weekend. He lugs around a crazy, souped-up DIY drum kit and puts all of my pot’n’pan drumming to shame. He’s also a fellow sawyer. Represent.
More on this year’s Hillside debauchery to come… as soon as I get my ass in gear.
I had horrible insomnia a couple of nights ago so I started playing around with a piezo mic and my little Honeytone amp to see what noises I could get from what. Here are my findings:
What have you tried? Leave a comment below or email me at hooksandladders@gmail.com!
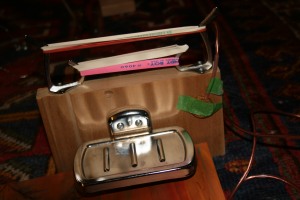
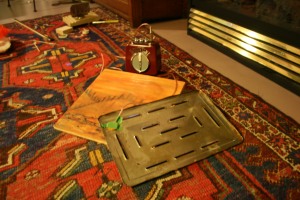
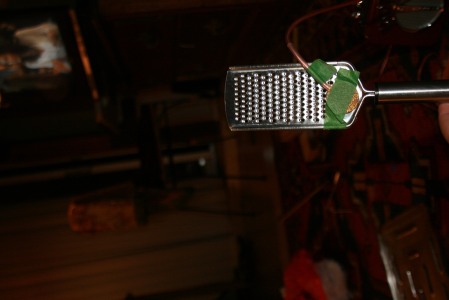
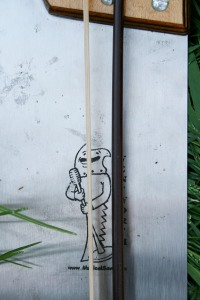
Life as a musical saw player can be a little lonely. It took me years before I met another saw player, and every time I do, I think I come on a little too strong and scare them as I try to rope them into saw jams with strangers. But, with all of the limited resources on the web, how’s a sawyer supposed to keep learning?
Googling the musical saw brings up hundreds of pages filled with more questions than answers. What is the best way to amplify the saw? What mic should you use? How do you record a saw? How the hell do you even play a saw in the first place?
Most of the answers I’ve found have been offline at shows, through trial and error. So, my favourite sound engineer Dave Lang and I took over the back room of the Tranzac for a few hours and decided to solve this saw mystery once and for all – then stick it up online for the world to (well, other saw players) to find.
Up to this point, we’ve always used a condenser mic in the front, then cranked it. This seems to be the universal way of doing it, however, some issues arose:
The scratchy bow noise can be very noticeable. What is the best way to cut down on it? Bow noise can add ambience when playing live, but it’s a pain in the butt in the recording studio. And, no, reverb isn’t the answer to everything.
When playing live (especially with the Lipliners, it’s a massive band) the saw is often drowned out. Cranking the condenser mic hasn’t been a solution because it often causes a lot of bleed-in from the other instruments around me, especially if I’m positioned near the drums.
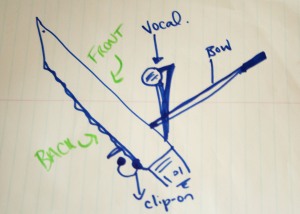
Luckily, Dave’s experiments were able to solve all of these problems! I’ll explain each test below so you can really understand why some strategies work better than others, but as an overview, this is officially the best way to get the best sound out of your musical saw:
The Process: In the main hall of the Tranzac, we tried out four different microphones and positioned them at the front, back and sides of the saw. Each time, we used a bass bow and a cello bow, and tried playing it alone and with music playing on the sound system behind me to mimic a live show setting (we used a live Calamity Royale track from the band we play in together.)
Test #1: Shure SM58 Standard Vocal Microphone
The SM58 is a good general purpose mic and probably the one you’re most likely to come across at shows. Lots of people gravitate toward it for the saw because the saw is in the higher vocal range. But, you’ll notice right away that it picks up the high-end bow noise.
Mic-ing underneath helped and though you have to crank the levels a bit more, it doesn’t feed back as much. Using a bass bow instead of a cello bow helped eliminate some of the “hisses” from the bow, but it didn’t do the best job.
Test #2: The super crazy condenser microphone Neumann KM184
This is a general purpose instrument mic and it’s very sensitive, but also very expensive (about $900.)
Because it’s so sensitive, it picked up quite a bit of the bowing noise. We tried mic-ing it from underneath and this helped to eliminate some of the bow “hisses.”
Test #3: Audio-Technica model ATM350 (a clip-on microphone)
We tried clipping this mic on every part of the saw and clearly, the winner was the bottom of the saw, positioned underneath. However, this does pick up a bit of the thumb “thumping” sound (if you’re not using a cheat handle to bend the saw, and use your fingers and thumbs to manipulate the blade like I do) so keep this in mind.
* ** This was a keeper!!! After this experiment, I used this exact clip-on mic and position on its own (without a vocal mic in front) at a Ronley Teper and her Lipliners show at Hugh’s Room. There were eight of us, and everyone said that they really heard my saw for the first time, but you’ll need to crank it in the monitor so you can hear it. ***
Test #4: Neumann KMS105 Vocal Microphone
This is an expensive mic (about $900) that isn’t good for everyone’s voices. It picks up a LOT more of the high-end of the voice. Because of this, again, it picked up a lot of the bowing noise, but was in between the SM58 vocal and the Neumann condenser mic.
FINAL VERDICT:
E-mail me at hooksandladders@gmail.com or comment below for any thoughts, questions, experiences or feedback you have and I’ll put it up here!
Happy sawing, and thanks Dave!
-SM
I thought I’d share some awesome thoughts on piezo mics, compliments of my super-talented friend Brian. I recently asked him for a coles notes version of how contact mics work so I could better understand why my experiments were working well or not working at all. He uses them to amplify his double bass, and here’s what he said:
“I have used piezo mics these ways:
– in a copper sheet stuffed under the bridge foot
– in four little steel (or aluminum?) cylinders each set in a hole drilled in the bridge behind each string
– In a plastic coating wedged in the wing of the bridge
– In a plastic cube glued on to the bottom of the bridge
– In a stick, with a spike on one end, wedged between the feet of the bridge
What all this tells you is that piezos can detect through a variety of surfaces, though each will sound different. There’s no way to know what will work without trying it. All of those bass piezos sound different on any given bass, so there’s no way to say one of your ideas is good or bad or better than another without trial and error, unfortunately.
Another important consideration is impedance. If you are thinking of a guitar amp as the primary way to amplify your stomp boxes, you are likely to have an impedance mismatch between your piezo and the guitar amp. Piezos are very high impedance and magnetic guitar pickups (which guitar amps are designed for) are fairly low, comparatively. It will still work, but some of the low end of your piezo will disappear and the equalization curve will be fucked in some way. That’s why acoustic guitars and basses use acoustic specific amps (sometimes) or (more often) put an impedance adjusting preamp in between the piezo pickup and the guitar amp.
I use this box to match impedance. It also has a phase reversal switch and a high pass filter (which is an eq curve that rolls off lows below a certain point at a pre-defined slope). You should try this with your stomps when they’re done, and see if it improves the sound. Or, build a similar circuit right into your stomps.”
I was really confused reading the overwhelming amount of info on the web and found his simplified version to be very helpful. Hope it helps you as well.
Thanks Brian!!!
GETTING THE BOARD
This sounds pretty lame and straightforward (it’s a box) but there are actually a few options. If you have any old wood kicking around, that’s the best thing, but if you have to go and buy yours like I did, make sure it’s “stomp-worthy.”
I was actually on a Home Depot run with my mom when I had my boards cut. We knocked and stomped on every piece of plywood in the place, I think, and I finally went with a multi-layered piece of plywood. I had one long board (that’s how it comes) cut into four even sizes (I needed four boards). The size was fine for me but not-so-fine for my friends J and M, two of my tall stompbox-testing friends whose big feet didn’t have much extra room if they were to stand on it. So… keep size in mind. No matter what they say, it does matter.
EXTRAS:
If you’ve sharpened your carpentry skills and want to make a box with sides (and meaning you won’t be standing or dancing on it) you can make sides, but if you want a versatile board, you can just crazy glue or nail some feet on the corners of one side. I suggest nailing them in… two of my board testers had a foot fall off so either I used the worst “super” glue ever or I should have nailed them. If putting feet on them, you can use anything that’s sturdy as long as it’s even. I used large wooden craft beads I found at my local craft store, which ended up being surprisingly sturdy and keep the boards wabble-free.
I have also built a few slip-on attachments for the boards, with different types of metal and steel to make different sounds, but I’ll put those in a post of its own.
SANDING & DECORATING:
If you’re planning on going-barefoot on the box at any point of time, or if the wood has rough edges, I highly recommend giving it a good scrub with a sanding sponge.
I decided to custom paint one side of each board (the tapping side, without the feet) using acrylic paints, with a landscape for J, an octopus scene for S, and KISS the band and fish for M (long story). I stained the other side (the dancing sides, with the feet) and painted a simple bird on them. I figured the dancing side would get scuffed up and I liked the look of the grain, especially with the stain. I gave both sides a good spray with a good arts and crafts water-resistant finishing spray for wood projects. It’s about $7 at your local craft store and let each side dry for 10 minutes.
PLACING YOUR CONTACT MIC:
Now it’s time to plug this baby in. Depending on your contact mic (if it’s homemade or if you went with a pretty Cold Gold one… if you have a clip-on or suction-cup one already that you prefer to use, this wouldn’t apply) tape the contact mic down with painter’s tape or a piece of duct tape. Make sure you’re taping the piezo disc down flat as can be against the wood because this is what’s going to pick up the vibrations. Also, make sure it’s the right side. You don’t want to put tape on the piezo disc and risk ruining it. In the case of a Cold Gold mic, it’s “gold disc-side down” but it’s pretty obvious when you have one in your hand, so don’t worry.
Placing the mic takes a bit of experimentation but I find that when I am tapping the board and it’s raised by the feet, it’s best to tape it to the edge or directly in the middle of the underside of the board. If I’m dancing on it, I tape it down at an edge of the surface I’m dancing on, directly under one of the feet so I don’t step on it (that’s loud!)
Stay tuned for my post about all of the stomp box effects and experimenting with levels and pedals.
TIME TO PLAY!
Now your stomp box is made, prettied up, plugged in – and ready to be played.
You’ll notice how sensitive the board is. You’ll see what I mean by trying the following:
– Stomp with a pair of shoes or boots on
– Tap with your toe and heel, or alternate
– March on the board in sock feet
– Dance barefoot on the board and roll your toes, go back and forth.
A little experimentation with how you’re comfortable playing, paired with some experimentation with levels and distortion, is all it takes.
Again, stay tuned for my post about all of the stomp box effects and experimenting with levels and pedals.
I hope this works out well for you and you’re stomping away! If this seems too time-consuming for you and you’d like me to make one for you, drop me a line at hooksandladders@gmail.com and we can hook something up.
Happy Stomping!
S.M.
Here are some photos my friends took of my stomp-boxes-in-progress: (That weird bomb-like contraption is really one of my first stomp box attachments, which I’ll explain later.)